

Google announced Gemini Nano which is a light weight model of Gemini model family. Gemini Nano is optimized to run on device and provide generative AI capabilities offline. Gemini Nano is available for Android developers and soon will be available for web developers to be used on Chrome browser. This will enable developers to utilize the capabilities of Gemini Nano within their application, thus providing a better user experience. In this tutorial, I will explain how to enable the built-in AI (window.ai) in Google Chrome and use it in an Angular app.
At the time of writing this article, Gemini Nano can be enabled on Chrome Stable version using Chrome flags.
Enable APIs Gemini Nano
First, you need to enable available APIs for Gemini Nano in Chrome browser. For that, navigate to chrome://flags/ by typing it in the URL bar of a browser window. Now in the Chrome Flags (Experiment) window, type “gemini nano” to find the relevant APIs.
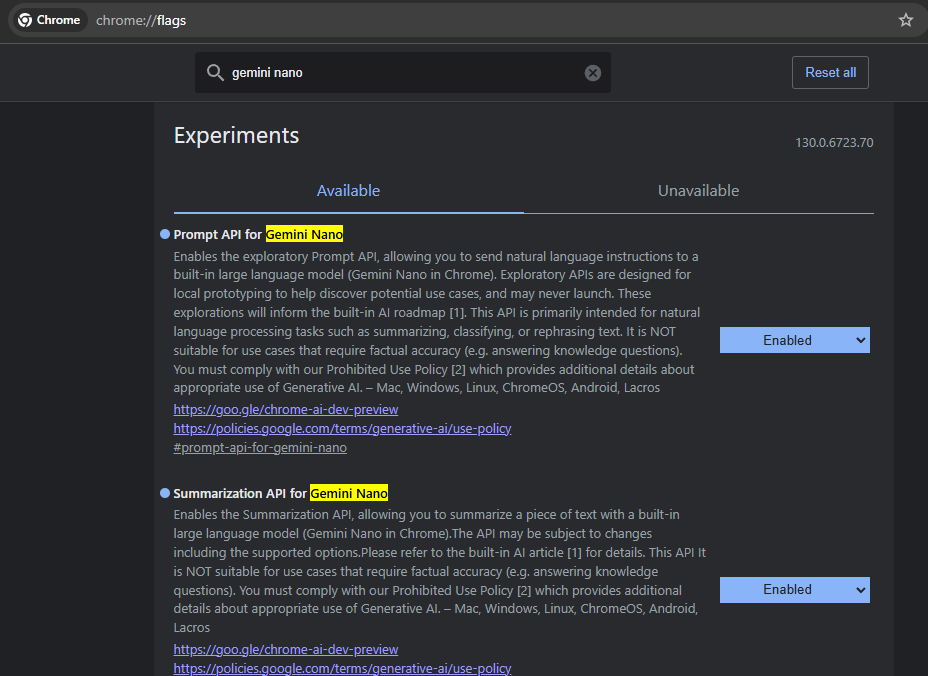
There will be 4 such APIs, namely: Prompt API for Gemini Nano, Summarization API for Gemini Nano, Writer API for Gemini Nano and Rewriter API for Gemini Nano. Chose “Enable” from the drop downs next to each API.
Now search for “optimization guide on device” while on the same page. For this flag, chose “Enable BypassPerfRequirements”.
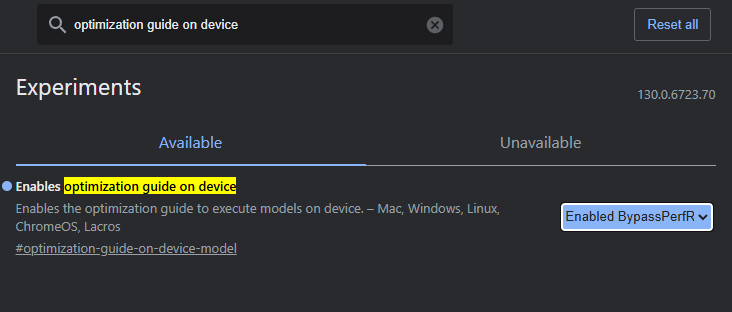
Now you have enabled all the necessary APIs which are needed to use Gemini Nano on browser. Now you need to download Gemini Nano model.
Download and Install Gemini Nano Model
Now navigate to chrome://components/ from the URL bar. Press Ctrl + F and search for “Optimization Guide On Device Model”. (Note: this may not appear at once sometimes. Restart the browser and see). Now click “Check for update” button to download the model.
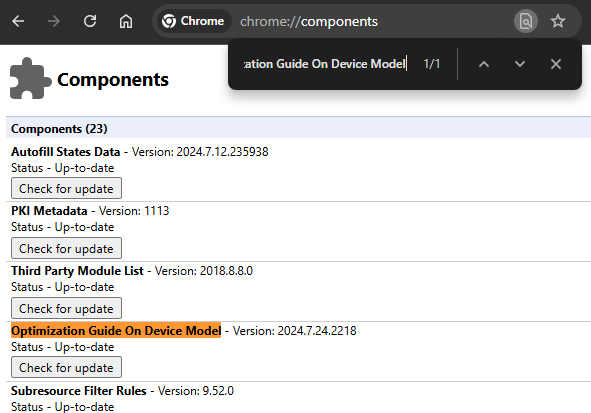
Make sure you have enough disk space as the model is around 2 GB in size. The download may take awhile. Once the download is completed, restart the browser.
Let’s use window.ai
If you are a web developer, you may be familiar with window interface, which contains the DOM document. We can access the built-in AI using this window interface as window.ai. Let’s use the Prompt API and build a very simple app in Angular.
As we are testing this using an Angular app, just create a new Angular app. Replace the code in app.component.ts with following code:
import { Component } from '@angular/core';
import { FormsModule } from '@angular/forms';

@Component({
  selector: 'app-root',
  standalone: true,
  imports: [FormsModule],
  templateUrl: './app.component.html',
  styleUrl: './app.component.scss'
})
export class AppComponent {
  prompt!: string;
  response!: string;

  async getAIResponse() {
    this.response = 'Initializing AI...';
    // Checks if  ai capabilities are supported by the browser
    const chromeAI = await (window as any).ai?.assistant.capabilities();

    if (chromeAI) {
      // Creates session with gemini nano model.
      const session = await (window as any).ai.assistant.create();

      this.response = 'Generating Response...';
      // Execute a prompt
      this.response = await session.prompt(this.prompt);

      // Destroys the session
      await session.destroy();
    } else {
      this.response = 'Chrome Built-In AI not supported.';
    }
  }
}
In the above code, first we check whether AI capabilities are supported and available in the browser. If available, we are creating a session and then we pass the prompt. Note that all these are returning Promises, so use them within asynchronous functions with await operator. Finally, we destroy the session to avoid unnecessary resource consumption. This is just a very simple implementation of window.ai in Angular, as still this feature is not stable. (As at 27th October, 2024).
Now replace the app.component.html with following code:
<div class="gemini-nano-chat">
  <input class="gemini-nano-chat__input" type="text" placeholder="Enter your prompt" [(ngModel)]="prompt">
  <button class="gemini-nano-chat__btn" type="button" (click)="getAIResponse()">Get Response</button>
  <textarea class="gemini-nano-chat__response" [(ngModel)]="response"></textarea>
</div>
And you can add the following styles in to app.component.scss (if you are using SCSS).
.gemini-nano-chat {
    display: flex;
    width: 60%;
    flex-direction: column;
    justify-content: center;
    padding: 1rem;
    gap: 1rem;
    &__input {
        height: 2rem;
        min-width: 80%;
        font-size: 1rem;
        padding: 0 0.5rem;
        border-radius: 0.5rem;
    }
    &__btn {
        padding: 0.5rem;
        background-color: #3065d8;
        border: 0.625rem solid #3065d8;
        border-radius: 0.5rem;
        transition: 0.5s ease-in-out all;
        color: #fff;
        cursor: pointer;
        &:hover {
            background-color: lighten(#3065d8, 10%);
            border-color: lighten(#3065d8, 10%);
        }
    }
    &__response {
        padding: 0.5rem;
        height: 6rem;
        min-width: 80%;
        font-size: 1rem;
        border-radius: 0.5rem;
    }
}
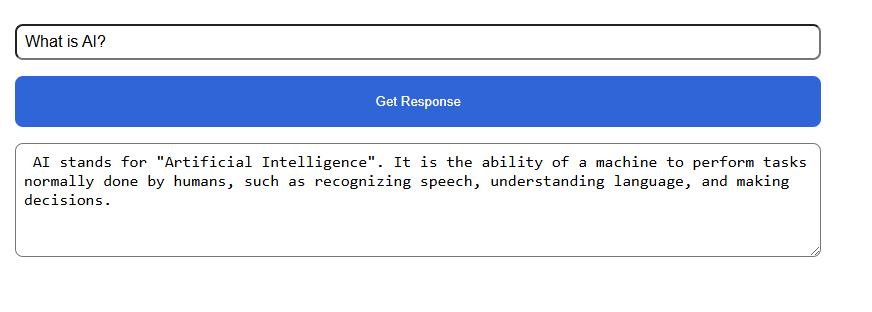
Now run the application to test our implementation. Type a prompt in the text box and click “Get Response” button. After awhile, a response will be displayed for your prompt.
Conclusion
The build-AI for Chrome is an handy feature you can play around with. Although this is an experimental feature as of now, we can create some cool apps using this. It is not super powerful AI model, but it can do some decent job. This quick guide only implemented the Prompt API. I will share more examples in the future. SO follow me to receive more updates. This project is available on GitHub as well.


